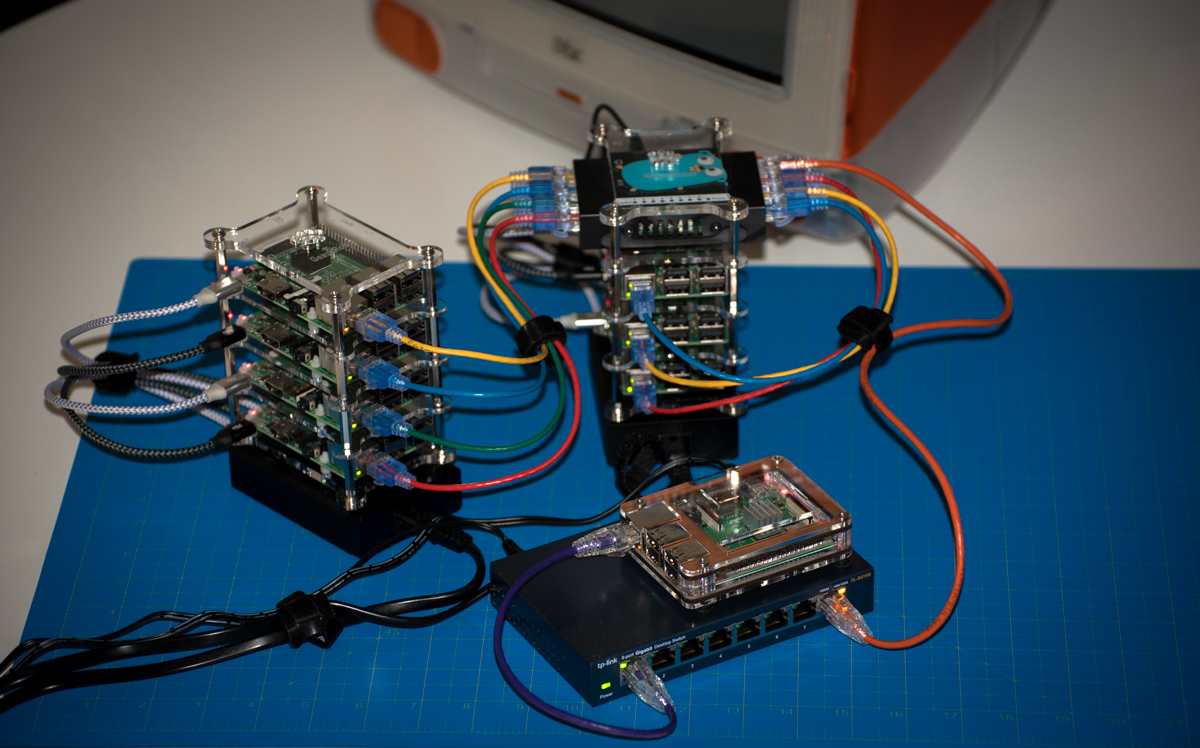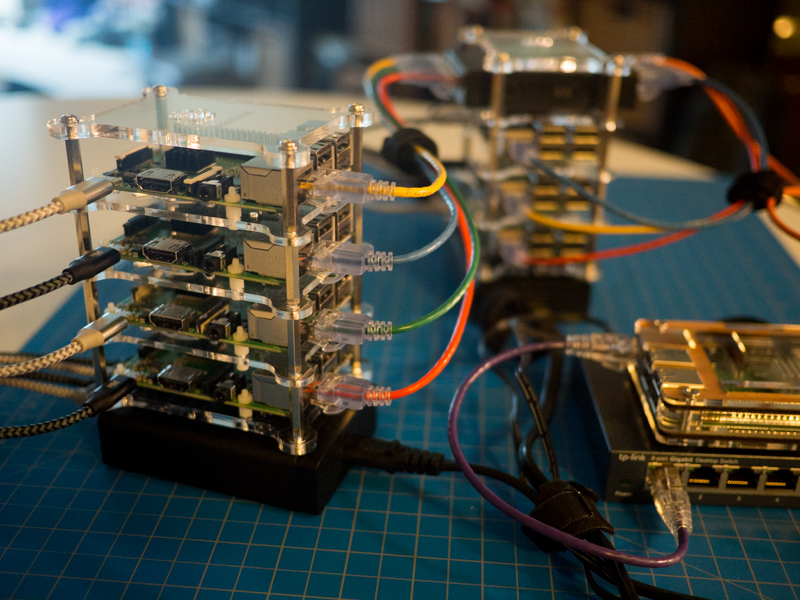
I started on this project in May 2018 after attending the Bay Area Maker Faire and having a bout of inspiration. Three months of sporadically working on it later and the cluster is finally complete! After a few detours around researching the performance of Raspberry Pi heatsinks and creating a Raspberry Pi router, I have finally finished building my Raspberry Pi cluster! Not only that, but I successfully installed Kubernetes on it! 😊
Now that this super computer is fully armed and operational, I’d like to write a bit about how I went about building it. I was primarily inspired by this blog post by Scott Hanselman and this other post by Chris Short the creator of rak8s which we’ll talk a bit more about in a bit. Those posts go more into the nitty-gritty of actual commands to run and for the most part I was able to follow them verbatim. Rather than regurgitate all that good information, I’m mostly going to cover what I did differently.
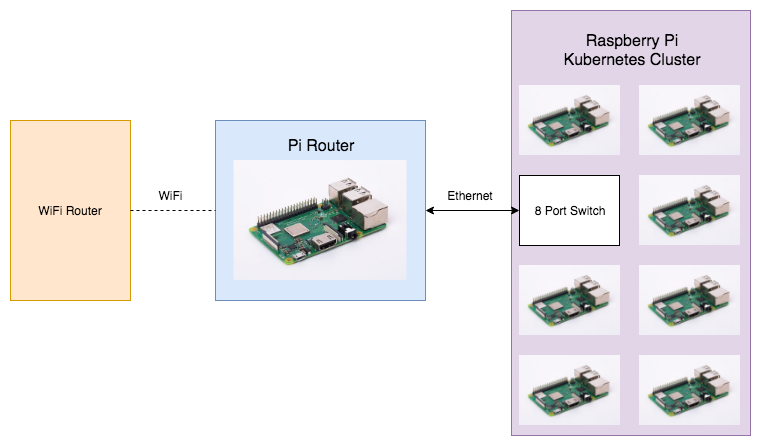
My cluster consists of eight Raspberry Pis altogether – one is serving as the Kubernetes master node, six are Kubernetes workers, and the last one is a router/dhcp server/jumpbox/etc. that lets the cluster conveniently connect to other networks. The diagram below demonstrates the network setup:

This setup means that my main home network does not need to be aware of the cluster and that I could theoretically bring it with me anywhere that has WiFi and it should work fine. Although I mostly followed the parts-list from Hanselman’s post, I had a lot of fun researching and acquiring parts so I made a few modifications for my cluster.
Parts List and Rationale
- Raspberry Pis
- 1x Raspberry Pi 3 Model B (had on hand)
- 7x Raspberry Pi 3 Model B+
- Raspberry Pi Heatsinks
- 8x Raspberry Pi 3 Heatsinks
- Raspberry Pi Tower Cases
- 2x GeauxRobot Raspberry Pi 3 Model B 4-layer Dog Bone Stack
- Wood Case for Pi Router
- 1x C4 Labs Zebra Wood Case
- Power Supplies
- 2x Anker 60W 6-Port PowerPort 6 USB Wall Charger
- USB Powered 8-Port Switch
- 1x BLACK BOX USB-Powered 10/100 8-Port Switch
- Regular 8-Port Switch
- 1x TP-Link 8-Port Gigabit Ethernet Network Switch
- MicroSD Cards
- 1x 32GB Sandisk Ultra MicroSD Card
- 1x 32GB Samsung Evo Select MicroSD Card
- 6x 32GB Silicon Power High Speed MicroSD Card
- USB Charging Cables
- 8x 1ft iSeekerKit Braided 28/21 AWG Micro USB cables
- Ethernet Cables
- 9x 1ft Monoprice SlimRun Cat6A Cable
- Gopher Sticker
- 1x unixstickers Pro Pack
I had one Raspberry Pi 3 Model B on hand when I started the project and bought six Raspberry Pi 3 Model B+s to round out the cluster originally. Unfortunately, one was dead on arrival and I ended up buying a few extras after that experience. So the cluster ended up with seven Pis internally and one external Pi serving as its gateway router.
I decided to go with two shorter stacks of Pis instead of one really tall stack because I was worried about it being top heavy – especially because I affixed the power supplies to the bottom of the stacks with some velcro. I went with two of the Anker 6 port chargers because at 60 watts they can really only supply enough power to four Raspberry Pi 3 B+s when they’re all under load since each one requires up to 2.5 amps. Similarly, I made sure to get quality USB cables to ensure each Pi was getting enough juice. ⚡⚡⚡
Hanselman’s blog post really sold me on the small USB-powered 8 port switch for its portability and ability to be powered by one of the Anker power supplies and I’m pretty pleased with it. I ended up tossing in another regular 8 port switch into the mix so that I can easily connect my Linux laptop directly to the cluster without having to go through the gateway Pi all of the time.
I originally tried to build the cluster out of regular 1ft ethernet patch cables, but they were just too thick and unwieldy. Monoprice’s SlimRun CAT6A cables were perfect for my needs, however.
Kubernetes Installation

Install Raspbian Stretch Lite
First, I downloaded Raspbian Stretch Lite and burned it to each MicroSD card using Etcher. Since these Pis are headless I needed a way to enable SSH without having to connect them to a monitor. Luckily, Raspbian makes this pretty easy. Just add an empty file named ssh to the root director of the SD card you just imaged and you’ll be able to SSH on to the Pi using the username pi and password raspberry.
Configure Hostname and Change Password
This part was a bit tedious. If I were to do this often I would probably script it, but since there were relatively few nodes in the cluster I just did it manually.
- SSH on to each PI
- Run
raspi-config - Change the hostname to be something other than “raspberry” (I chose Animal Crossing characters)
- Change the
piuser’s password to be something other than “raspberry”
Disable Swap
Swap space lets your OS use your disk as memory when it runs out of physical DRAM. Normally this is desirable, but when it comes to SD cards it is deadly. Unlike solid state drives designed to handle a large number of writes, SD cards do not typically have the necessary wear-leveling logic and writing to them as if they were RAM can really shorten their lifespan. I followed this StackOverflow post mostly and ran the following on each Pi:
sudo dphys-swapfile swapoff && \
sudo dphys-swapfile uninstall && \
sudo update-rc.d dphys-swapfile remove
Give Clustered Pis Static IP Addresses
Kubernetes will want deterministic IP addresses for the nodes in the cluster. I did this by adding the following configuration to the /etc/dnsmasq.conf file on my router Pi. Essentially, each Pi’s MAC address is given a hard-coded IP address on the internal subnet I set up for the cluster. I go into this in more detail in my Raspberry Pi router post.
# /etc/dnsmasq.conf
dhcp-host=b8:27:eb:00:00:01,10.0.0.50
dhcp-host=b8:27:eb:00:00:02,10.0.0.51
dhcp-host=b8:27:eb:00:00:03,10.0.0.52
dhcp-host=b8:27:eb:00:00:04,10.0.0.53
dhcp-host=b8:27:eb:00:00:05,10.0.0.54
dhcp-host=b8:27:eb:00:00:06,10.0.0.55
dhcp-host=b8:27:eb:00:00:07,10.0.0.56
This gist by Alex Ellis discusses ways you can accomplish the same thing by setting some config on the nodes themselves.
rak8s Ansible Playbook
As I mentioned earlier, I’m very thankful for the rak8s Ansible playbook. I just installed Ansible on the router Pi (treating it as a jumpbox) and cloned the rak8s Ansible playbook down. I went through the documented steps on the rak8s site and miraculously it all worked pretty much out of the box!
Next Steps
Now I know what you’re thinking, “What is he going to do with all of this computing power?!” 😛 Honestly, I don’t know. I could have just installed minikube on my desktop workstation and have had a more powerful, x86-based Kubernetes at my disposal. That would have definitely been easier and more practical – especially since the software I want to run on it, such as Knative, doesn’t really ship with arm compiled binaries.
What I did have, though, is a lot of fun. 😊 It was fun to research, fun to build, and fun to learn a bit more about networking. I’m not sure if I’ll continue running Kubernetes on it, but it will definitely be fun to use the cluster to play around with some parallel algorithms. I may also try compiling Concourse CI for arm and installing it on a few of the Pis. It would be fun to have an low-power task runner at my disposal.
If you just want to focus on learning Kubernetes, definitely go the minikube route or use a hosted offering like GKE. But if you want to learn about networking, running Kubernetes on bare-metal, or even are just interested in having a cluster of Pis to call your own, I hope you found this post valuable.
Cheers!