
Cgroups, also known as control groups, are a feature of the Linux kernel which allow groups of processes to be managed and monitored. The Linux man pages go into greater detail, but the gist of it is that cgroups allow you to do things like limit the amount of CPU usage of a process, limit the amount of memory that a process can consume, control how many additional processes a process can fork, and even “freeze” a process in place. If you’re familiar with Linux containers at all, cgroups are what enable a container orchestrator – such as Cloud Foundry or Kubernetes – to place resource limits on the containers that they create.
I recently purchased a Raspberry Pi Zero and with a 1GHz processor and 512MB of RAM it’s actually a pretty capable little machine for five bucks. Although I’ve used containers extensively through runc, I haven’t played around much with the container primitives (namespaces, cgroups, etc.) themselves so the Pi Zero presents a nice opportunity to kick the tires on these things.
Getting Started
To start out, I installed the latest version of Raspbian Stretch Lite on my Pi. At the time of writing this post I am was using the “June 2018” version of Raspbian Stretch which includes version 4.14 of the Linux kernel.
I then sshed on to the Pi and took a look around at what cgroups were available. Since cgroup controllers appear as mounted filesystems, this was as simple running the mount command.
pi@lightyear:~ $ mount | grep cgroup

cgroup on /sys/fs/cgroup/systemd type cgroup (rw,nosuid,nodev,noexec,relatime,xattr,release_agent=/lib/systemd/systemd-cgroups-agent,name=systemd)
cgroup on /sys/fs/cgroup/cpu,cpuacct type cgroup (rw,nosuid,nodev,noexec,relatime,cpu,cpuacct)
cgroup on /sys/fs/cgroup/blkio type cgroup (rw,nosuid,nodev,noexec,relatime,blkio)
cgroup on /sys/fs/cgroup/devices type cgroup (rw,nosuid,nodev,noexec,relatime,devices)
cgroup on /sys/fs/cgroup/net_cls type cgroup (rw,nosuid,nodev,noexec,relatime,net_cls)
cgroup on /sys/fs/cgroup/freezer type cgroup (rw,nosuid,nodev,noexec,relatime,freezer)
Since Raspbian Stretch uses systemd, it went ahead and mounted a bunch of cgroup controllers automatically for us. Curiously, however, the memory cgroup was missing. Inspecting /proc/cgroups confirmed that this was the case.
pi@lightyear:~ $ cat /proc/cgroups
#subsys_name  hierarchy num_cgroups enabled
cpu 2 1 1
cpuacct 2 1 1
blkio 3 1 1
memory  0 1 0
devices 4 46  1
freezer 6 1 1
net_cls 5 1 1
Enabling the Memory Cgroup
Turns out that the memory cgroup is disabled by default since it adds some additional memory overhead. Fortunately, on Raspbian Stretch enabling the memory cgroups involves simply adding an additional parameter to the Kernel boot parameters that gets executed when your Pi boots up.
To do this, just use your favorite text editor and, with root permissions, add cgroup_enable=memory to the existing list of parameters in /boot/cmdline.txt. Then reboot your Pi with sudo shutdown -r now for the changes to take effect.
pi@lightyear:~ $ cat /proc/cgroups
#subsys_name  hierarchy num_cgroups enabled
cpu 3 1 1
cpuacct 3 1 1
blkio 4 1 1
memory  2 1 1
devices 7 45  1
freezer 5 1 1
net_cls 6 1 1
That’s better! In fact, systemd (I think) was nice enough to already mount it for us! 😊
pi@lightyear:~ $ mount | grep memory
cgroup on /sys/fs/cgroup/memory type cgroup (rw,nosuid,nodev,noexec,relatime,memory)
Limiting Memory Usage with the Memory Cgroup
The Raspberry Pi Zero only comes with 512MB of RAM. That’s a lot for embedded applications, but not a ton for a computer running a modern OS. Luckily, with the memory cgroup we can limit the amount of memory our processes can consume! There’s a nice little utility you can install called stress which lets you simulate all kinds of load on your system – including memory usage. Let’s make a new process group within the memory cgroup and see if we can keep stress under control.
First, create a new directory within the mounted memory cgroup.
sudo mkdir -p /sys/fs/cgroup/memory/pi-group
That’s all it takes! You can see all the options available by just listing the files in that directory:
pi@lightyear:~ $ ls /sys/fs/cgroup/memory/pi-group

cgroup.clone_children       memory.kmem.max_usage_in_bytes      memory.limit_in_bytes            memory.swappiness
cgroup.event_control        memory.kmem.slabinfo                memory.max_usage_in_bytes        memory.usage_in_bytes
cgroup.procs                memory.kmem.tcp.failcnt             memory.move_charge_at_immigrate  memory.use_hierarchy
memory.failcnt              memory.kmem.tcp.limit_in_bytes      memory.oom_control               notify_on_release
memory.force_empty          memory.kmem.tcp.max_usage_in_bytes  memory.pressure_level            tasks
memory.kmem.failcnt         memory.kmem.tcp.usage_in_bytes      memory.soft_limit_in_bytes
memory.kmem.limit_in_bytes  memory.kmem.usage_in_bytes          memory.stat
Now let’s put our current shell within the pi-group we just created so that we can easily apply the group’s constraints to all of the processes we spawn.
pi@lightyear:~ $ echo $$
379

pi@lightyear:~ $ sudo sh -c "echo $$ > /sys/fs/cgroup/memory/pi-group/cgroup.procs"
pi@lightyear:~ $ cat /sys/fs/cgroup/memory/pi-group/cgroup.procs
379
772
As you can see, our shell’s pid is now within the pi-group cgroup (pid 772 belongs to the cat command we just executed).
Let’s say we want to limit our pi-group to only be allowed to use half of our Pi’s available ram. To do this, we’ll update the memory.limit_in_bytes.
pi@lightyear:~ $ sudo sh -c "echo 268435456 > /sys/fs/cgroup/memory/pi-group/memory.limit_in_bytes"
pi@lightyear:~ $ cat /sys/fs/cgroup/memory/pi-group/memory.limit_in_bytes
268435456
Now let’s run stress with the -m option to consume memory and see what happens!
pi@lightyear:~ $ stress -m 1 --vm-bytes 400M --vm-keep

stress: info: [845] dispatching hogs: 0 cpu, 0 io, 1 vm, 0 hdd
stress: FAIL: [845] (415) <-- worker 846 got signal 9
stress: WARN: [845] (417) now reaping child worker processes
stress: FAIL: [845] (451) failed run completed in 12s
What just happened? Let’s check out memory.oom_control.
pi@lightyear:~ $ cat /sys/fs/cgroup/memory/pi-group/memory.oom_control
oom_kill_disable 0
under_oom 0
oom_kill 1
The Out of Memory Killer killed our stress process for going over our prescribed memory limit of ~256MB. This file shows the state of the OOM Killer and if we run stress again, the value for oom_kill will be incremented to 2.
As you can see, the memory cgroup can be very useful for multi-tenant container orchestrators looking to enforce memory usage limits!
Limiting CPU Usage with the CPU Cgroup
As I mentioned earlier, the Raspberry Pi Zero comes with a 1 core 1GHz arm CPU. That’s great for a five dollar computer, but it’s still not a lot. What if you have a whole bunch of processes running on it and you want to personally allocate CPU time to them?
That’s where the cpu cgroup controller comes in. The cpu cgroup provides two means of controlling CPU usage: the cpu.cfs_period_us/cpu.cfs_quota_us properties and the cpu.shares property. The first two properties allow you to specify a period in microseconds and a quota for how much of that period processes in the group can consume. So for example, if I specified 100 microseconds as the value for cpu.cfs_period_us and 25 microseconds as the value for cpu.cfs_quota_us my process could run roughly 25% of the time. You can read more about the specifcs here. The cpu.shares property is a bit fuzzier – it essentially allows you to allocate shares of CPU usage to the process group which are relative to the parent groups in the cgroup hierarchy.
For example, if the root cpu cgroup claimed to have 1024 shares and that groups direct child had 512 shares, processes within the child group would be given 50% of available CPU time when the system is under heavy load. If the system is idle, processes in the child group would be able to use their parent’s 512 unused shares and consume additional CPU time. This means that we can use cpu.shares to ensure critical processes aren’t starved out when they need to run, but also ensure that available CPU time is not wasted.
I wanted to show an example of the cpu.cfs_period_us/cpu.cfs_quota_us subsystems, but unfortunately found that they were missing on my Pi. I thought that this may be a case similar to the memory cgroup, but turns out that Raspbian is missing the CONFIG_CFS_BANDWIDTH kernel compile-time flag (see this Github issue). I don’t want to go down that rabbit-hole of compiling my own Raspbian, so instead I’ll demonstrate the power of cpu.shares.
I used the same stress that we used earlier, except this time with the -c argument to simulate a CPU intensive task. As you can see in the picture below, running it with just one worker is enough to dominate the Pi Zero’s single core CPU.
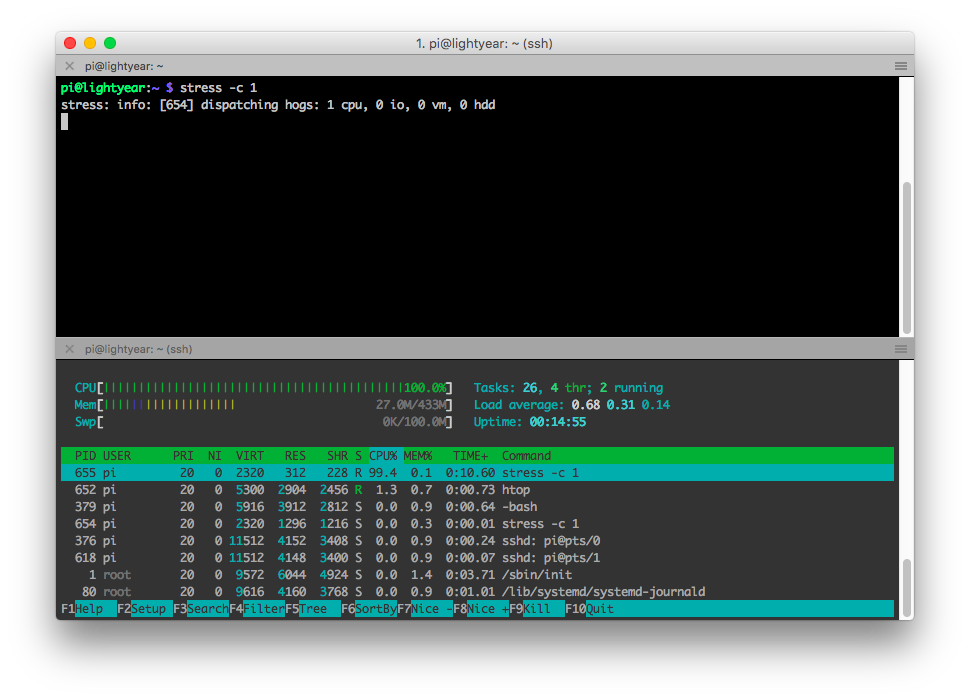
Let’s try to reign it in.
Again, let’s create a new pi-group process group, this time under /sys/fs/cgroup/cpu.
sudo mkdir -p /sys/fs/cgroup/cpu/pi-group
We’re going to be modifying the cpu.shares property, so let’s first make a note of the value in the top-level cpu cgroup.
pi@lightyear:~ $ cat /sys/fs/cgroup/cpu/cpu.shares
1024
Ok, so 1024 shares. Let’s limit our stress program to only be able to use 25% of the available CPU shares.
pi@lightyear:~ $ sudo sh -c "echo 256 > /sys/fs/cgroup/cpu/pi-group/cpu.shares"
pi@lightyear:~ $ cat /sys/fs/cgroup/cpu/pi-group/cpu.shares
256
Now let’s move our stress worker process into the pi-group cgroup.
pi@lightyear:~ $ pgrep stress
953
954
pi@lightyear:~ $ sudo sh -c "echo 954 > /sys/fs/cgroup/cpu/pi-group/cgroup.procs"
pi@lightyear:~ $ cat /sys/fs/cgroup/cpu/pi-group/cgroup.procs
954
If you look at the CPU usage of stress now in top, you should see that it’s still using ~100% of the CPU. That’s because, as we mentioned earlier, there aren’t any other processes contending with it so it’s happily consuming all available “global” shares. Let’s put some more load on the system and see what happens. openssl is known for being CPU hungry, so let’s give it some nonsense work to do!
pi@lightyear:~ $ openssl sha1 < /dev/zero
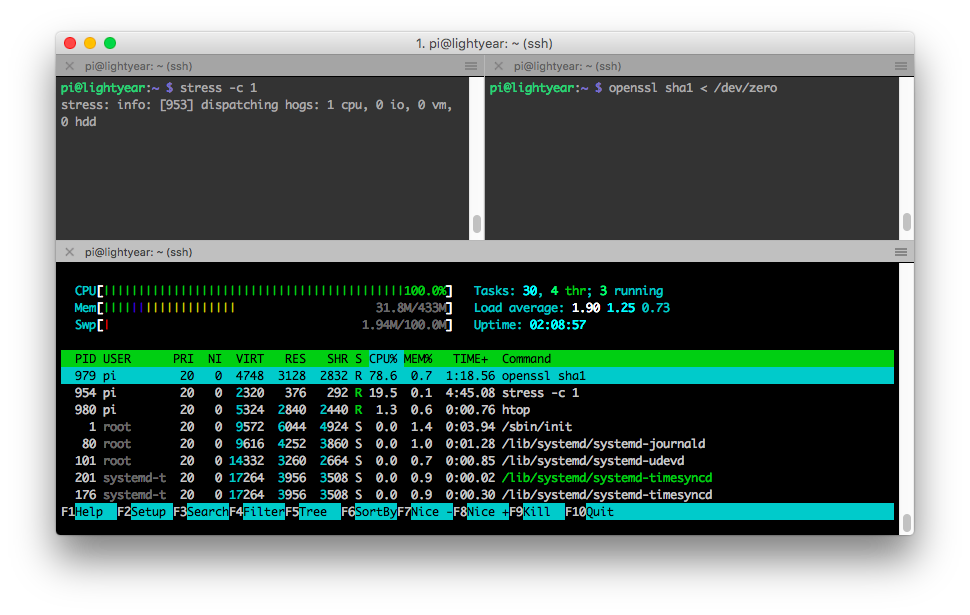
Now it’s not exactly 25%, but our stress process is now using considerably less CPU since the presumably more important openssl process needs it. You can see how this could be useful if you had some lower-priority, long-running CPU hungry tasks that you’d like to execute on your Pi. If we kill openssl, stress can happily go back to consuming all of the CPU again.
Putting Processes on Ice with the Freezer
Now let’s pretend that we actually cared about what stress was doing. Maybe it’s crunching some important numbers for us or folding some critical proteins. We want it to finish up eventually, but in the mean time we want to play Minecraft on our Pi and want it to take a break.
The Freezer let’s us do just that. We can use it to suspend processes in cryostasis and unthaw them later when it’s time for them to resume whatever it was that they were doing.
Let’s try freezing the simple Python program hello-there.py below:
# /tmp/hello-there.py
import sys
import time

for i in xrange(sys.maxint):
    print("hello there!", i)
    time.sleep(1)
You can run it by doing python hello-there.py and it will print “hello there!” along with the current count every second. Let’s go ahead and kick it off.
pi@lightyear:~ $ python /tmp/hello-there.py
('hello there!', 0)
('hello there!', 1)
('hello there!', 2)
('hello there!', 3)
...
In another session let’s go ahead and create a pi-group process group within the freezer cgroup.
pi@lightyear:~ $ sudo mkdir -p /sys/fs/cgroup/freezer/pi-group
Using pgrep we can find the pid of our python program and assign it to pi-group.
pi@lightyear:~ $ pgrep python
1025
pi@lightyear:~ $ sudo su -c "echo 1025 > /sys/fs/cgroup/freezer/pi-group/cgroup.procs"
pi@lightyear:~ $ cat /sys/fs/cgroup/freezer/pi-group/cgroup.procs
1025
Now let’s freeze it!
pi@lightyear:~ $ cat /sys/fs/cgroup/freezer/pi-group/freezer.state
THAWED
pi@lightyear:~ $ sudo su -c "echo FROZEN > /sys/fs/cgroup/freezer/pi-group/freezer.state"
pi@lightyear:~ $ cat /sys/fs/cgroup/freezer/pi-group/freezer.state
FROZEN
The terminal session running the hello-there.py script should be frozen now – suspended in time. If you find the process in top or htop you’ll find that it is now consuming 0% of the CPU.
Let’s unthaw it now.
pi@lightyear:~ $ sudo su -c "echo THAWED > /sys/fs/cgroup/freezer/pi-group/freezer.state"
You should see the output resume and our friendly program continue to count up. Pretty cool! Check out the freezer subsystem kernel docs for more information about this cgroup. It’s pretty simple to use but enables powerful scheduling functionality.
That’s it!
Well, that’s about it for this post at least. I enjoyed exploring what cgroups were available on this Raspberry Pi Zero and I hope you did too! Thanks for reading along!